
Assembly Instructions
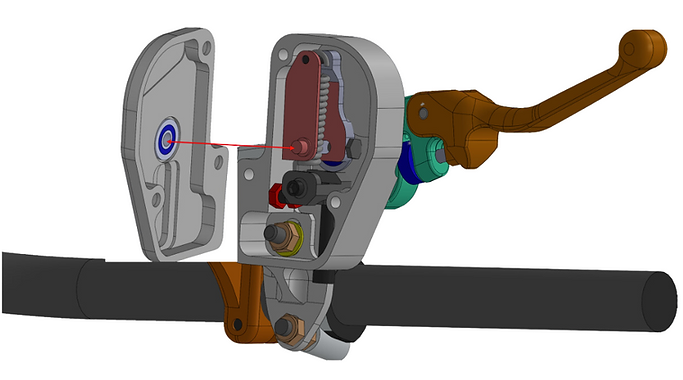
Brembo
(DOWNLOAD INSTRUCTIONS)
OR WATCH VIDEO
Braktec
Assembly Instructions
OR WATCH VIDEO
(DOWNLOAD INSTRUCTIONS)
IMPORTANT INFORMATION
1. Try to rotate the master cylinder upwards for better ergonomics during installation
2. Grease components and surfaces that has friction
3. Tools for installation: (7mm ,8mm,10mm open Wrench, 10mm socket, flat screwdriver, 2mm,4mm allen key)
.png)
Hardware Provided with the Kit
1.0
Remove all accessories from handlebar-clutch side, insert handlebar adapter according to illustrations.

2.1
Assemble clutch pump with the M6 bolts according to illustration, grease master cylinder piston round tip.
.png)
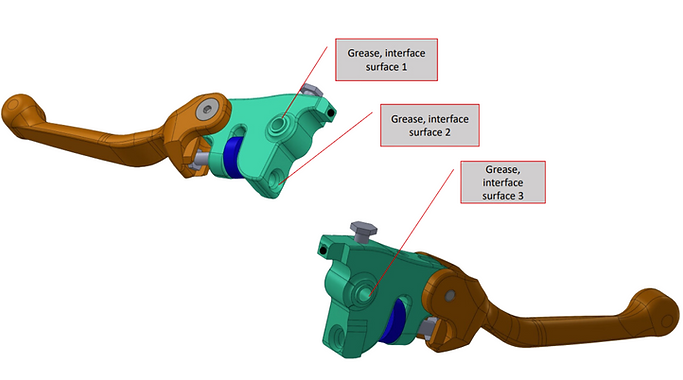
2.2
Grease the handle in all three interface points with master cylinder.
.png)
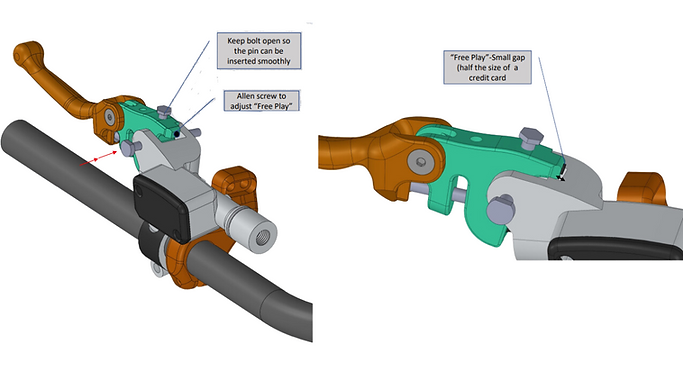
3.0
Assemble handle with main shaft according to illustration and adjust “handle free play” with Allen key * Free play : make sure the handle is not pushing the pump piston while in resting position.
.png)
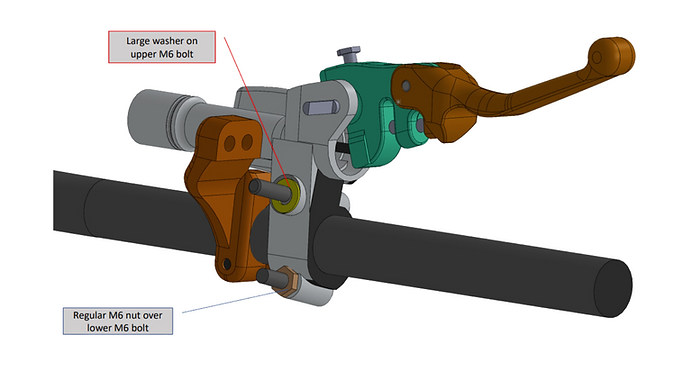
4.0
Install the large washer onto 45mm bolt. Then install the thin nut (non nyloc ) onto the lower M6 bolt per the illustration. DO NOT torque the nut against the master cylinder.
.png)
5.0
Assemble lower housing according to illustration.

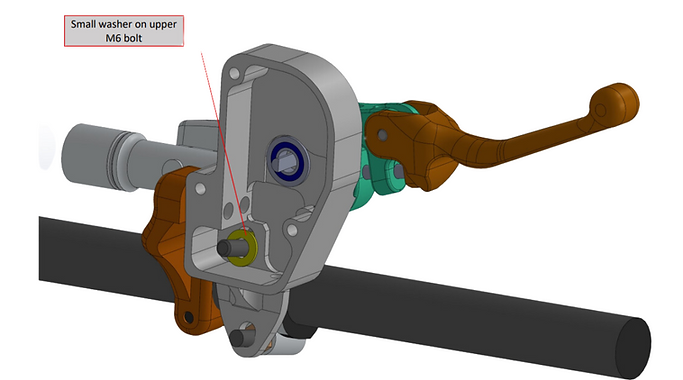
6.0
Place Small washer on front M6 bolt.
.png)
7.0
Place the M6 Nyloc nuts over both M6 bolts, tighten the nuts so the lower housing is still loose and can move slightly.
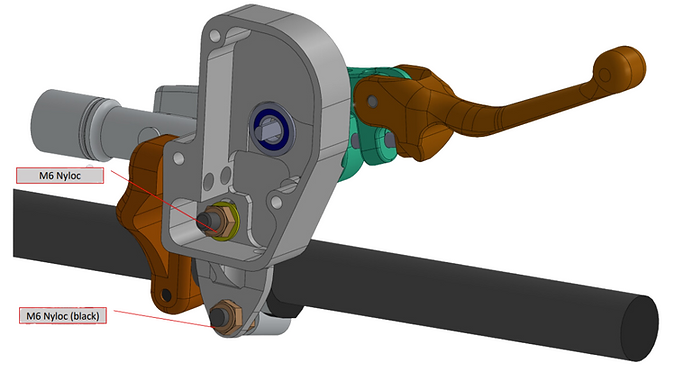.png)
8.0
Insert one M5 X 35 mm bolt into the handlebar adapter and lower housing and lightly tighten the Nyloc nut. Do not over tighten and keep the upper housing slightly loose.
.png)
9.0
Insert the linkage system over the main shaft while holding the shaft from the top.
.png)
10.0
Adjust the shaft height and orientation according to the illustration below.
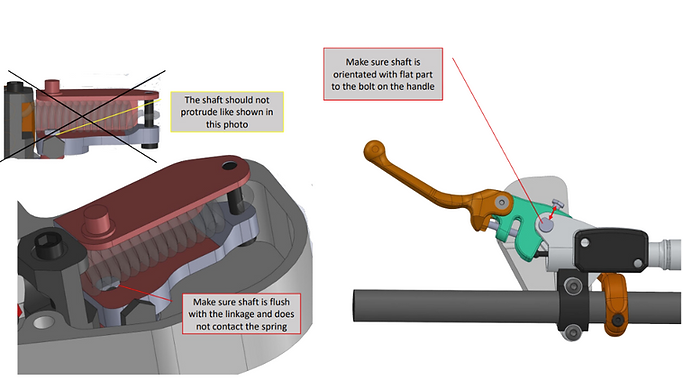.png)
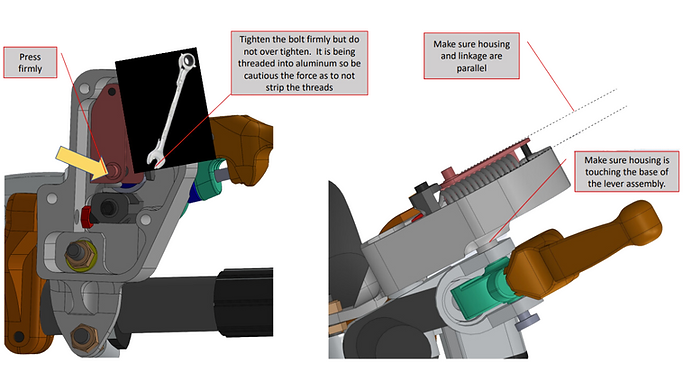
11.1
Press the linkage on ensuring that it’s fully inserted into the housing while tightening the bolt with the 7mm wrench.
.png)
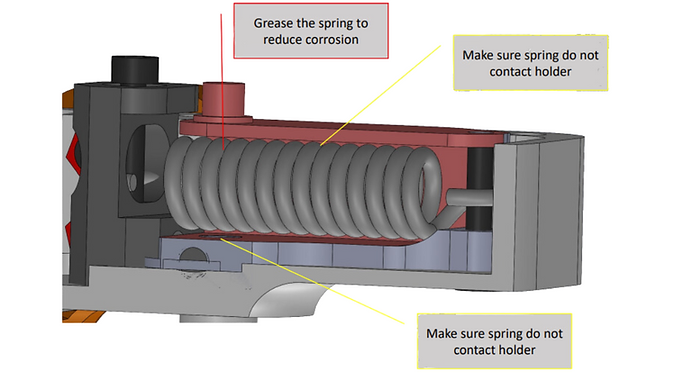
11.2
Make sure the spring is located at the middle of spring older and their are no contact points between them.
.png)
12.0
Press the on linkage from other side and make sure it’s fully inserted to housing while tightening the bolt with 8mm wrench.
.png)
13.0
Tighten the bolt with Allen key.
.png)
14.0
Tighten the M6 nuts, follow the sequence of steps1.2.3. below.
.png)
15.0
Tighten the lower bolt first with 8mm wrench, then insert second bolt and tighten (do not over tighten).
.png)
16.0
Insert the M5 x 35mm bolt and make sure the spring puller is tilted towards the bolt so it will thread smoothly. Tighten by hand at first to ensure that you don’t cross thread the bolt.
.png)
17.0
Tighten Allen bolt until the spring puller slides down the small step and is now parallel with the housing.
.png)
18.0
Place the housing cover ensuring the bearing is centered over the linkage pin.
.png)
19.0
Ensure that the cover is flush on all sides of the unit. You should not see any gapping. ( the bolts do not need to help close the gap).
.png)
20.0
Tighten the 4mm Allen bolt clockwise until the pull is easy but natural and to the desired feel. If the clutch lever does not return after being pulled, back the Allen bolt out a couple of turns so that that lever returns freely. and have a blast on your ride ☺
.png)
Release of Liability Disclaimer for Aftermarket Off-Road Use Only Clutch Assistance System
By installing and using the aftermarket off-road use only clutch assistance system (referred to as “Easy Clutch system"), you acknowledge and agree to the following terms:
• Assumption of Risk: You understand that the product is designed for off-road use only and may alter the functionality of the clutch system. The use of the product involves certain risks and hazards, including but not limited to the potential malfunction of the product, resulting in a non-functional clutch. You voluntarily assume all risks associated with the installation, use, and maintenance of the product.
• Product Limitations: You acknowledge that the product may not be suitable for all vehicles and that its performance can vary depending on factors such as vehicle condition, modifications, and maintenance. It is your responsibility to ensure the product is compatible with your vehicle and meets your specific needs.
• Proper Installation and Maintenance: You agree to follow all instructions provided by the manufacturer for the installation, use, and maintenance of the product. Any failure to comply with these instructions may result in product malfunction and subsequent clutch system issues.
• Release of Liability: In consideration for being permitted to use the product, you hereby release, discharge, and hold harmless the manufacturer, distributors, retailers, and their respective employees, agents, and affiliates from any and all claims, liabilities, damages, losses, or expenses arising out of or in connection with the installation, use, or performance of the product, including but not limited to any malfunctions, accidents, injuries, or damage to property.
• Indemnification: You agree to indemnify and hold harmless the manufacturer, distributors, retailers, and their respective employees, agents, and affiliates from any claims, actions, damages, liabilities, or expenses (including legal fees) arising from your use of the product, including any claims brought by third parties.
• No Warranty: The product is provided "as is" without any warranties, expressed or implied. The manufacturer, distributors, and retailers disclaim any warranties of merchantability, fitness for a particular purpose, or non-infringement. You acknowledge that the product may not always operate as intended and that no guarantees are made regarding its performance or reliability.
• Governing Law: This release of liability disclaimer shall be governed by and construed in accordance with the laws of [Insert jurisdiction]. Any disputes arising from this disclaimer shall be subject to the exclusive jurisdiction of the courts in [Insert jurisdiction]. By installing and using the product, you confirm that you have read and understood this release of liability disclaimer and agree to be bound by its terms.